Do you know?

The "MiniTool Software" can easily use to create partition for your Computer without formatting it? If no, look forward and see how ...........

I grabbed this Tutorial from my lovely friend Atoyebi Taiwo a.k.a TB GIST in which he gave me to install on my system and it worked. Big thanks being given to him as he get me update on this Tutor because i never see this type of Software before. 

See How The Software works below:
Immediately you run the software, what next you will see is as shown in the below picture. 

After you click on the "Mini Partition Wizard" It display as shown below:

Download Bluestacks and continue using Android Tab on your PC

Am sharing a new tutorial for you today (14/05/2014). This tutorial is "A MUST HAVE" Tutorial. Many people don't know if they have a PC they have a Android Tab Nor Android Phone. You may be thinking how come about it, but to know what am saying better. Go through the below Tutorial and follow the simple step on it.......

The Overview of BlueStack Application looks like the image below:


How To Add Google Custom Search Below All Blogger Post

I shared with you the other time "How To Add Facebook Comment Box To Blogger Blog". In which it can brings traffics to blog/website.
Today, am sharing another Blog Tutorial which can also generate you a free traffic.

What i want to share is something like this: (See the below picture)

To Get Started:
Login To your Blog Account

How To Add Facebook Comment Box To Blogger Blog

This Tutorial will enable people checking your Blog to Comment using Facebook Comment Box. It also let people on Facebook see the comment from your Blog on Facebook wall.


To Get Started:
Login To Your Blog Account

Go To Template

How To Add Related Posts Widget To Blogger Blog

The related posts widget will show a new related posts section below your post.


To Get Started Follow The Step Below:


How To Root An Andriod Device + Why You Need To

Here is an Exclusive Tutorial on How to Root an Andriod Phone easily following Some Simple Steps.
This is the easiest Tutorial on the Internet on How to Root Andriod Devices.

                                           andriod logo 400x400 How To Root & Andriod Device + Why You Need To
 
Why Root My Andriod Device?
Let’s start with why you would want to root your Android smartphone. Sometimes apps require special permission that the Android OS, which is based on Linux doesn’t allow. These could be simple as taking a screenshot to higher level permissions to the core Android files.

See The Full Meaning Of SIM Card – Which 90% Don’t Know

 See The Full Meaning Of SIM Card   98% Dont Know


I know 90% of People using SIM card don’t know the meaning of SIM they used every day.

8 Apps To Turn Your Windows PC Into A Wi-fi Hotspot

Wifi Tech!! 8 Apps To Turn Your Windows Pc Into A Wi fi HotspotSharing your computer’s internet access among your Wi-Fi devices is an easy way to save bandwidth and maintain network security. In this post, I have put up a collection of the best Wi-Fi software that can share a single internet connection among your friends,devices and other Wi-Fi enables products.
Let’s Get Started :
1. Virtual Router – Wifi Hot Spot
Virtual Router is a simple windows program developed by Chris Pietschmann a Microsoft MVP for Bing Maps and Co-Founder of Carto LLC. This freeware turns your Windows 7, windows 8 and Windows 2008 R2 into a super Wi-Fi hot spot.
with virtual router, user can wirelessly share their internet connection with any device and connections are completely secured with WPA2 (the best wireless encryption.)

Download Quickteller App 2.5 for BB & Android


What is QuickTeller?
Quickteller app
Quickteller is the easiest and most convenient way to buy airtime, make payments, send and receive money. The good part? You don’t necessarily need a separate wallet or e-Purse. It works with your current Verve card. Payments can be made to all the merchants and businesses available on Quickteller.com including: DSTV, Swift Internet, ipNX internet, Airtel Postpaid, PHCN, and a whole lot more. We add more every day.

12 Tips on How To Reduce Your Monthly Wireless Bill

Use Wi-Fi whenever possible.
A most obvious tip yet equally rewarding as well... using Wi-Fi whenever possible will help cut down on data usage, especially when streaming music or video to your smartphone. I realize that some may disable Wi-Fi when not in use due to extra battery drain but forgetting to turn it back on could be a financial mistake if you don’t have an increasingly rare unlimited data plan. Just use caution when submitting sensitive information over public hotspots and you should be fine.


Negotiate a lower rate.

Despite what you’ve probably been taught, everything is negotiable. Your mileage here will vary but you’ll never know unless you ask. This usually works best in person at your local authorized retailer, but deals can be arranged over the phone as well. One way to segue into a negotiation is threatening to take your business elsewhere.

Free Download PrinterShare Mobile Print PREMIUM 8.7.5 APK

Free Download PrinterShare Mobile Print PREMIUM 8.7.5 APK
PrinterShare™ Premium Lets You Print anytime, anywhere from your Android device! 

Now you can instantly print PDF files, office documents 
(Word, Excel, PowerPoint), bills, invoices and more directly from your device 
to a printer right next to you or across the world.

Airtel Free GPRS Trick 2014

Hi Friend's,
Today I Am Sharing With you the Latest Airtel Free GPRS Trick for 2014.


Follow Below Instructions:-
  •  Proxy:- 85.17.141.35
  •  Port:- 80
  •  Apn:- airtelgprs.com
  •  Homepage:-  124.153.106.131 OR 69.64.78.198 OR 10.5.45.107 OR 202.58.121.201 OR 122.170.122.191 OR 125.21.241.7

Steps To Take After Unlocking Fastlink Modem, Glo Modem,Zain Modem,Etisalat Modem With IMEI Number

It is no more News that you can unlock your 3G Faslink Modem, Unlock Glo Modem, Unlock Zain Modem, Unlock Etisalat Modem and turn them to Universal Modems with which you can use any SIM card of any network of your choice. This is been possible with the help of Unlocking Softwares which require mainly the IMEI number of your Modem for them to calculate the unlocking code for you within a click of a button.

Some smart guys have been making money for themselves offering this unlocking service in return for cash, while some are offering the service free of charge. I have been unlocking for some people free of charge while some also do send me recharge vouchers just to help them do it and text it to their phone. This way, I keep receiving a lot of recharge vouchers, enough for me to be paying for my internet subscription. Imagine, thats just the new way I now browse for free.......

What To Do After Receiving The Unlock Code

Once you have your unlock code handy, insert a SIM CARD different from the network that originally owns the modem i.e if you have MTN Fastlink modem, remove the MTN SIM and replace it with maybe Glo, Zain or Etisalat SIM. Thereafter, plug your modem back into your computer. After some seconds, you should then see a small window in which you can input the Unlock code. The picture below is what the small window normally looks like.


Type in the unlock code correctly inside the small window and click enter. If the unlocking is successfull, the small window will disappear meaning that your 3G modem has been successfully unlocked

NOTE: If any small window DID NOT pop up, then it simply means your modem is not locked. To confirm this, you should also see the name of the new network, lets say Glo, appearing next to the network bars at the lower left corner of the modem's dashboard.

You ONLY have 10 attempts to unlock your modem
. This simply means if you input the WRONG code 10 times, then your modem will be locked FOREVER. Hance, don't think you  can use "Try & Error" or Permutation to get the unlock code. This is not "Further Mathematics"...lol

The Unlocking software will always calculate the right Unlocking code for you. So, let people that have the software unlock for you.

How To Create Profiles For MTN, Glo, Zain and Etisalat

After unlocking your modem, you will need to create new profiles for other networks you want to connect to via the unlocked modem..

To do this, click on "Tools" then "Options" under which you will now select "Profile Management".

Under Profile Management, click on New and fill in the following for each network you want to setup as shown in the picture below..


For MTN

Profile Name: MTN
APN:  web.gprs.mtnnigeria.net
Username : web
Password : web

For Globacom

Profile Name: Glo
APN:  gloflat
Username : :flat
Password : flat

For Zain

Profile Name: Zain
APN:  internet.ng.zain.com
Username : internet
Password : internet

For Etisalat

Profile Name: Etisalat
APN:  etisalat
Username :web (you can also leave it blank)
Password : web (you can also leave it blank)


Once you’re done creating the profile, click Save to save the settings, then New if you want to set up another network.

When you’re through setting up the networks, go back to the Connection page, select the network you want to browse with, from the drop down box, then click connect.

If everything was setup properly without any mistake, you should be able to get connected to the Internet unless the network is messing up at that point in time.

Note:  As at the time of writing this, it has been observed that some MTN fastlink modems do not work with GLO SIM even after unlocking.

Presently, I am using a Glo Modem and I have used ALL the networks with it. The Glo Modem has interface for making calls, checking account balance and for loading vouchers. More so, the Glo Modem has a special support for Windows 7, hence, works perfectly with it.

That's all for now.

I hope this helps...


Go here to unlock your Modem

Feel Free to share this blog post with your friends using the share buttons below this post.

If you have anything to say or ask, Kindly make use of the comment form below.

Cheers!

How To Decode A Modem

Once you have the unlocking code, write it or save it somewhere. Then, insert ANOTHER SIM card (apart from the original network that originally works with it) into your modem. You will be prompted with a bar to fill in the Unlock code. (It usually gives 10 attempts). Just input the unlock code. That's All.

Thereafter, you will have to create new profiles for the networks you want to be using on the modem. If you are a Nigerian, you can check "Steps to take after unlocking your modem" for info on how to create internet settings for your modem.

If your modem is a ZTE modem e.g etisalat zte modem, you can check out this tutorial on Nairaland on how to use dccrap in unlocking zte modem. You will also find the download link of the dccrap software on the thread.


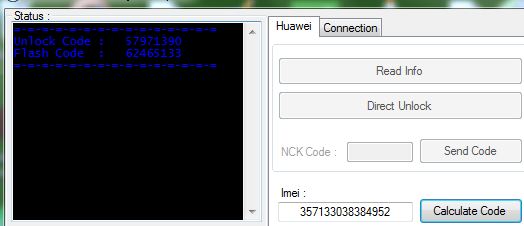
Below are snapshots of  two different unlockers:


Wondering how you will know if your modem is Huawei or ZTE? Just look at the body of the modem.

If you have an huawei modem, you can drop your imei number via the comment form below and I will reply you with the unlock code. If you don't know it, you can check out this video on how to get the imei number of a modem.

How To Use XE.com to convert Euros,Dollars to Naira

XE is the world's favorite provider of online Internet foreign exchange tools and services. One of my favorite XE tools is the XE currency converter which I use alot especially whenever I want to convert my Google Adsense earnings from Euro to US Dollars and Nigerian Naira respectively. In this blog post, I am sharing with you how I use the currency converter.


How To Get Started

==> Go to : http://www.xe.com/ucc/

==> You will see the XE currency converter widget. Click the "Converter" tab


==> Enter the amount you want to convert into the "amount" field e.g 1000

==> In the "From" drop-down box, select the currency you want to convert FROM e.g EUR-Euro

==> In the "TO" field, select the currency you want to convert TO e.g NGN-Nigerian Naira

==> Click the "convert" button

Wait and after some seconds/minutes, you should see the result.

That's all.

Cheers!

How to Reveal Hidden or Shortened URLs

I use Twitter a lot! Using Twitter a lot comes with it's own challenges. One of such challenges is that I get lots of Tweets from people via replies and DM (direct messages) asking me to check out some URLs (links). Due to the fact that Twitter only allows 140 characters, people choose to hide or shorten the URLs.

Some of these URLs are genuine while most are complete spam. Clicking on these links might expose your Twitter account to hacking. It might also be a source of malware to your computer, tablet or mobile device. The best way to confirm this is to find a way to reveal all hidden or shortened URLs you get on Twitter.
You should also do the same thing for all the shortened URLs you get in your email address and over the internet and social networks. This would secure you from a lot of troubles and unnecessary clicking of the URLs you are not sure of.
How Do I Reveal Hidden or Shortened URLs?
I use UrlReveal to achieve this. The site has been very useful for me. You can use it also. You don't need to rush and start clicking all the hidden or shortened URLs you receive.
As shown in the image above, enter the hidden or shortened URL in the space provided and click on "Show me the real URL" button.
I hope this helps? Let me know if it does.

How To Disable Disable Right Click On Blogger Blog

Preventing text selection on your blog is one of the more popular ways to fight plagiarism as it prevents anyone from copying texts easily from your blog. While it is effective to some extent, in preventing content theft, it also frustrates honest readers by denying them access to useful functions associated with the right click menu, such as Back, Reload, Save as.., Print etc


There are different ways you can disable right-click on your blog. The popluar methods include source padding, css encoding, javascript encryption and trapping the mouse right click.

In this post, I am sharing with you, a simple code you can use to disable text selection on your blog and it works perfectly on Blogger blogs. If you implement it, your blog readers will not be able to select any text, hence they will not be able to right-click. Although, they will be able to right-click on links and images.I like this trick because anyone trying to copy will not even see any pop up telling him or her that the right click has been disabled.


plagiarism


If you run an entertainment blog, you can implement this on your blog but if you run a tutorial blog, I don't think this will be a good idea unless you will ensure that your readers will still be able to copy some codes you might have shared in some of your blog posts. 

Below is the simple code you need to disable right click.

<style type='text/css'>
.post-body {
  -webkit-user-select: none;  /* Chrome all / Safari all */
  -moz-user-select: none;     /* Firefox all */
  -ms-user-select: none;      /* IE 10+ */
  -o-user-select: none;
  user-select: none;        
}
</style>


If you don't want to disable right click on all your blog posts, you can just disable it in a single post by copying and pasting the code at the end of your post in the HTML view of your Blogger Post editor. (Not compose mode).

If you want to disable right click on all the posts of your Blogspot blog, go to Template > Edit HTML nd use CTRL F to find : </b:skin>

Directly below it, copy and paste the code.

Try it and let me hear from you if it works for you or not. If you know other methods, kindly share via comments.

Mind you, the smart ones will still be able to bypass it but this is still better than doing nothing. To prevent theft of your post images, I recommend you add watermark to the images to prevent reuse.


Cheers!

How To Recover and Reset Blogger Password and Email

If you're having troubles accessing your blog via the Blogger sign in page just because you've forgotten your Blogger password or because you've forgotten the email account you used for registration, Blogger offers an account recovery tool which you can use to resolve the issue on your own.


You can access the Blogger's account recovery tool at  http://www.blogger.com/forgot.g


Password recovery tool
Blogger Account Recovery Tool


How To Recover Blogger Username or Email


To recover your Blogger Username or Email, enter your blog's URL in the space provided and click on the "Lookup" button. Blogger will send an email message with login instructions for the blog to the Gmail accounts associated with the blog.

So, if you check all your GMail accounts, you will see the email message in the inbox of the account associated with the blog. You can then use the Google account email to sign in to Blogger.com and access your Blog.

How To Reset Blogger Password


Lookup your blog's URL as explained above. In the email message you will receive, Blogger will include a link you can click to reset your Blogger password if you've forgotten it.

Alternatively, you can reset it via Google password assistance page or by entering your email address in the email field of the Blogger account recovery tool.

Forgot Your blog URL?


Just go to www.blogger.com and sign in with your GMail account. You should see your blog on the Blogger dashboard.  Click on the "view blog" button. Once your blog loads in your browser, you can then copy the blog's URL from the browser address bar.

That's all.

I hope this helps.

How To Back Up Blogger Blog Posts and Comments

If such happens and you have a back up file of your blog, you can easily create a new blog and restore the content of your old blog. Besides, if you decide to move to Wordpress, the .xml back up file is all you need to restore your blog posts and comments to the Wordpress blog.
Backing up your Blogger blog is very easy. You can get it done easily using the "export" feature of Blogger. The Blogger tool lets you save a copy of your blog on your hard drive. The export tool will not back up your Blogger template though, just your posts (including drafts) and comments.


STEPS

    ==> Sign in to www.blogger.com
    ==> Click on the Small arrow beside the "view blog" button
    ==> Click on "Settings" > "Other"


    ==> Click on the 'Export blog" link under Blog tools.


download Blogger export file


    ==> Click on 'Download blog"
    ==> Save the .xml file to your PC

That's all.

You can rename it to include the date your backup and you can upload it to the cloud eg to dropbox, Google drive etc so you can always access it from anywhere whenever you need it.

The total number of posts and comments will determine the size of the export file.

Remember, your data is very important. So, DO NOT download your back up on public computers.

You can use Google TakeOut to back up all the blogs in your Blogger dashboard and if you want to back up the design/look of your Blogger blog, read how to back up Blogger template.

When last did you back up your blog?

What is Dropbox?

Dropbox is an online storage service which allows you to access your photos, videos, docs anywhere.  It is a kind of lock box in which anything you upload to it can be accessed anywhere you go in as much you have access to the internet. You will have access to your files on the go via the web and your mobile devices.

If you register for your dropbox account at the dropbox website, you will be able to upload files to your dropbox account. If you now download dropbox app to your Blackberry, iPad, iPhone or another computer, you will be able to access all those files you have uploaded to your account. This means that any file you save to your dropbox will automatically save to all your computers, phones and even the dropbox website.


When you install dropbox software to your computer, it creates a new folder on your computer. It works like any other folder on your hard drive but everything in the dropbox folder automatically syncs to your dropbox account on the web and to any other device you might have installed the dropbox app.

To me, dropbox is better than a network drive because you cannot access files on your hard drive with your other devices, even from the web unlike files in your dropbox which stay on your computer's hard drive (i.e accessible when offline) and at the same time accessible via the web or any other device you might have installed dropbox to. 

Dropbox works in the background and if you add files to it while offline, it will automatically sync any new changes the next time you are online. If you want to access the files in your dropbox on your computer, let's say via the dropbox on your iPad, you will have to log in to the iPad dropbox app with the same login details you used for the dropbox software on your computer. Hence, your files are safe.

If you use cyber cafes alot, with the help of DropBox, you won't have to be moving all around with your flash drive or your external hard drive every-time. All you just need to do is to be uploading your files to your dropbox online account so you can always retrieve them to your other computer, Blackberry, iPad etc.

How Do I Add Files to My Dropbox Folder?

It is very easy. Just drag and drop them into your dropbox folder.  The files you dropped in will be backed up to your online dropbox account automatically and synced to your other devices.  You can even save files directly to your dropbox folder from any application on your PC.


From the link above, you will be able to download dropbox for iPad, Blackberry etc and also for your computer. Feel free to go check out the HELP page on the website for more tutorials on how to use DropBox efficiently.

Cheers!